Verse Chorus Songwriting
Soundtrap:
Verse/Chorus SONGWRITING
Verse/chorus song structure is used in most styles of music; from dance to grunge, metal and beyond. The repetitious nature of this form with its shift between the familiar and unfamiliar is successful with most listening populations. Songs using the verse/chorus pop form is something that every musician and producer will encounter.
Learn to how to write a song using verse/chorus pop form with drums, bass, chords, and lyrics.
Learn
Phrases
A phrase is a musical sentence. Most pop music is created by using the repetition of four-measure phrases. The song London Bridge Is Falling Down is made up of two four-measure phrases.

Form
The verse/chorus song form made up of alternating repeated sections that are interrupted by a bridge. Pre-choruses and interludes can add variation to this structure, but the majority of the form is the same. Song sections are built using repetitions of phrases.
Intro: Beginning of the song | Can use the same chord progression as the verse or chorus.
Verse: Repeated Section | New words every time. The verse sometimes tells a story.
*Prechorus: Before the chorus | Can have the same words or different words every time. Might have a different chord progression.
Chorus: Repeated Section | Same words every time. Contains the hook. The song’s title is in the lyrics.
*Instrumental Interlude: Between sections | Usually a single phrase without words. Might have a different chord progression.
Bridge: Non-repeated Section | Different chord progression from verse and chorus. Sometimes has an instrumental solo.
Ending: End of the song | Can use the same chord progression as the verse or chorus. Types of endings: crescendo, fade out, stop, tag, hit and hold.
*Repeated song sections are differentiated by their chord progressions and harmonic textures.

Here is a sample form structure for a verse/chorus pop song.
Drum Fills
A drum fill is usually played in the last measure of a four-measure phrase and takes up either all of the beats or the last beat(s) of the final measure. During a drum fill, the subdivision is moved from the ride or high hat to either the snare, kick, and/or toms. Not all of the subdivisions have to be played during a fill, and patterns are made through repetition and use of space. The drum fill in this phrase occurs during the last two beats of the last measure in the first phrase.
Listen
PHRASE COUNTING
Choose a song from This Playlist →
Count the number of beats in each measure, and count the number of measures in each phrase by saying the measure number on the first beat of each bar.
Ex. |1 2 3 4 | 2 2 3 4 | 3 2 3 4 | 4 2 3 4 | 4 BAR PHRASEKeep track of the phrase repetitions in each section by holding up fingers in your hand
Ex. 1 Finger |1 2 3 4 | 2 2 3 4 | 3 2 3 4 | 4 2 3 4 | 2 Fingers |1 2 3 4 | 2 2 3 4 | 3 2 3 4 | 4 2 3 4 | 2x4 SECTIONComplete the Song Form Transcription Worksheet →
Apply
MARKING SONG FORM
Use regions to mark the different sections of the sample song in Soundtrap.
Listen to the song in Soundtrap.
Add a new track (it doesn’t matter what instrument).
Move the playhead to the desired area and click edit > add empty region.
Extend the region to fit the phrase length by clicking and holding the handle at the bottom right hand corner of the region.
Loop the regions to show phrase repetition in each section by clicking and holding the handle at the top right hand corner of each region.
Label each region with the section name by hovering over the region and clicking edit > edit name.
Add new regions for each song section.
NARRATING HARMONIC TEXTURE
Listen to each section and note what chordal instruments are playing and what rhythmic roles they are fulfilling.
Add a voice and microphone track
Record yourself describing the harmonic texture of each section while it is playing.
Example
A Song About Pop Songs
Dumb pop song was written and recorded during a forty five minute song writing challenge. Because there was such a short amount of time, only the bare essentials were able to be tracked making it easy to see the songs form and texture. The drums, bass, and chordal parts were recorded as four measure sections and then looped and duplicated to create the form.
The harmonic rhythm of the verse is one chord per measure which is contrasted with the quicker harmonic rhythm of the chorus. The texture of the drums also aide in the differentiation between sections with the removal of the hihat in the verses and bridge.
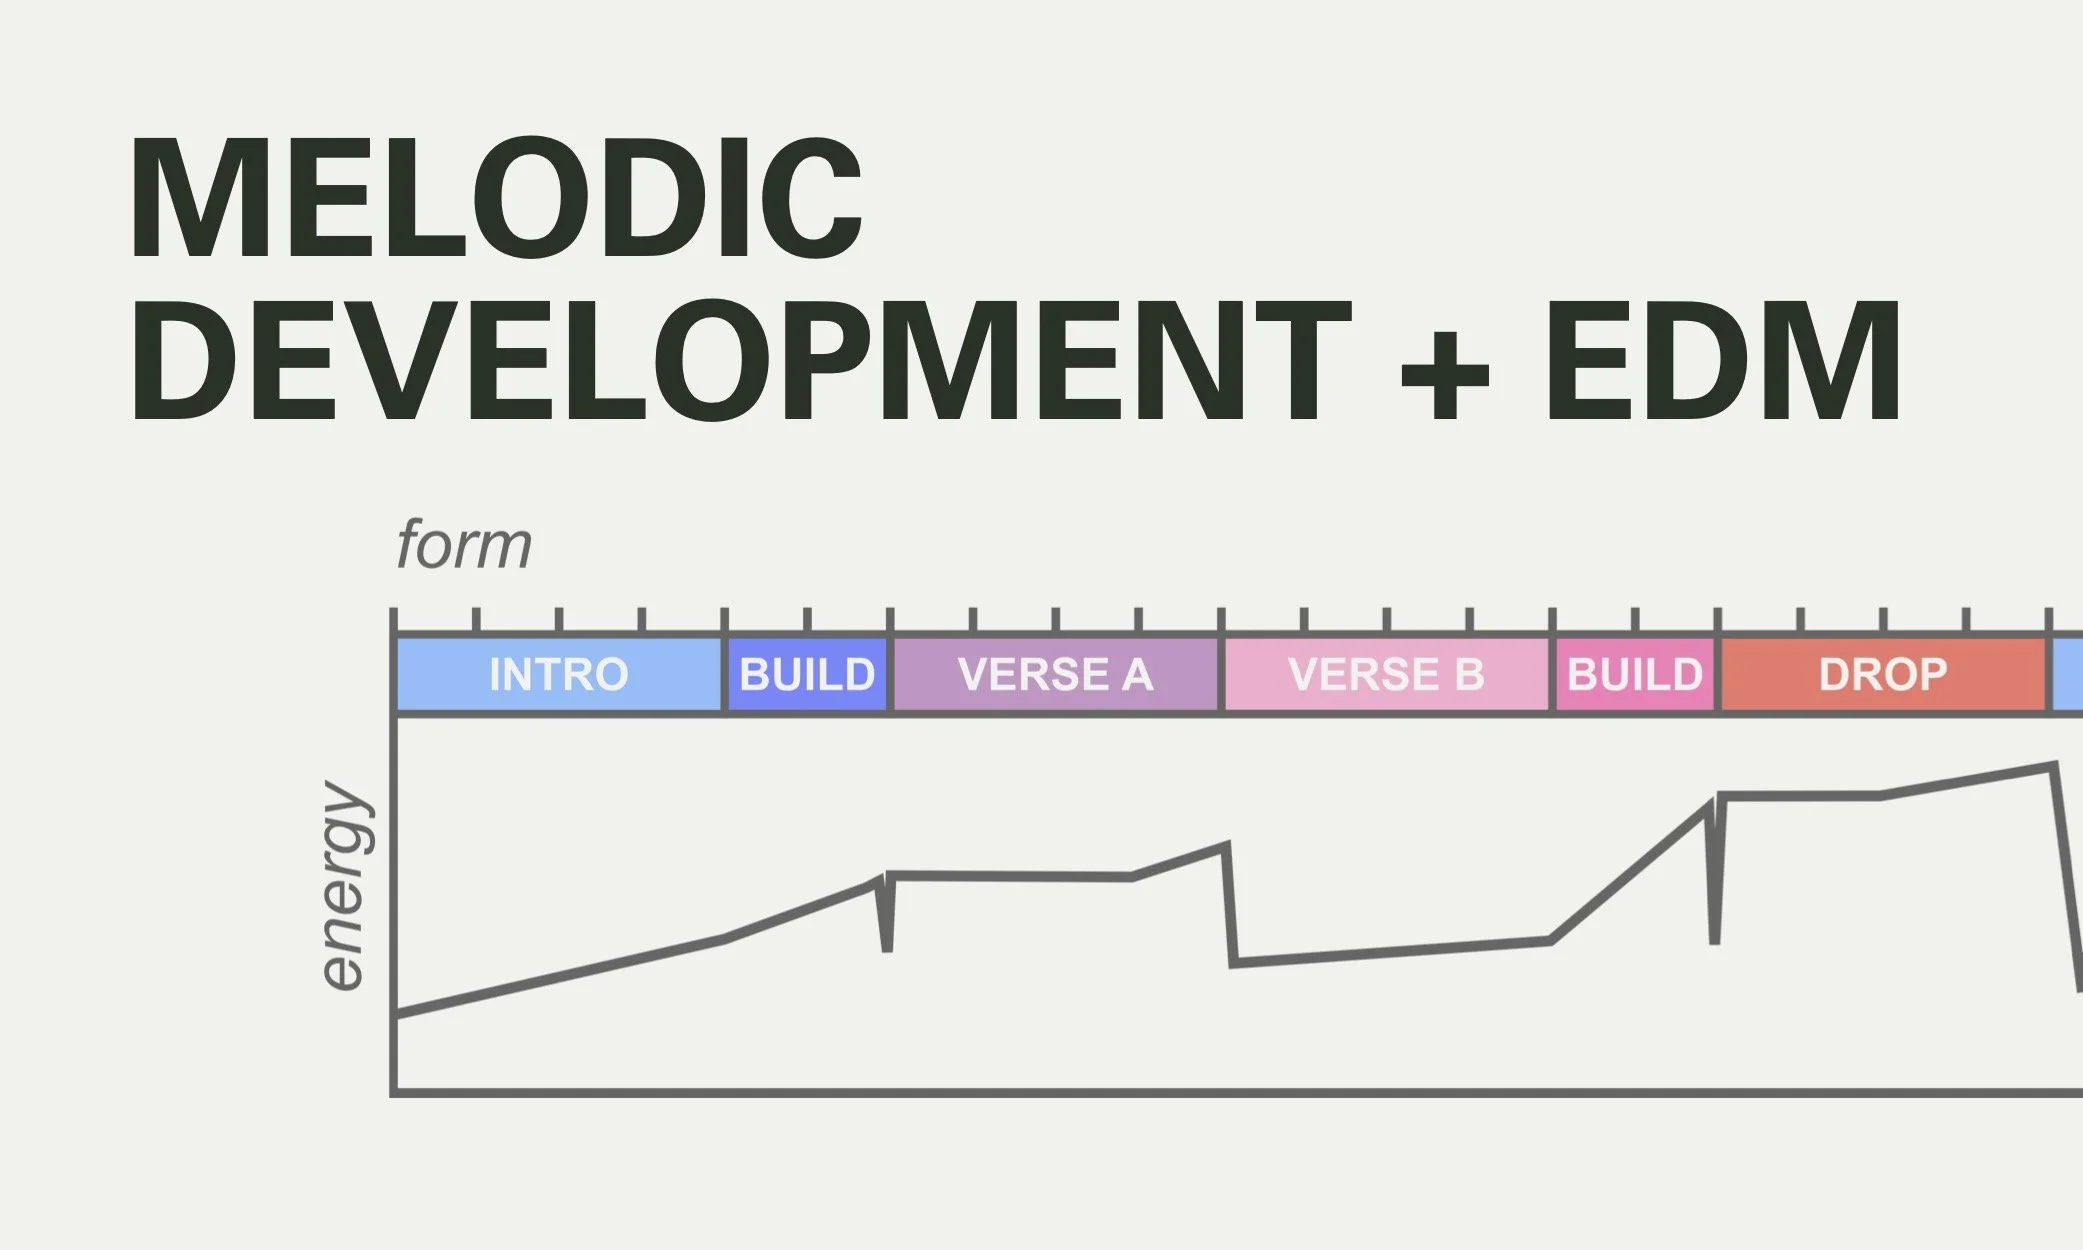
Here is an energy map of the example song. Notice that the energy of each repeated song section is different because of the change in harmonic texture.
Write
1 WRITE THE CHORD PROGRESSIONS
There should be three chord progressions in your song, one for the chorus, verse, and bridge.
Write a chord progression for your chorus by using the Chord Progression Page and the Harmonic Rhythm Page for help.
From here, you can either complete a single section’s drums and bass or write two additional chord progressions for the other sections.
Use harmonic rhythm as a tool to differentiate your song sections; building in more chordal movement will give a section more a sense of direction.
Record a scratch chordal part (or one with a rhythm if you have an idea) for each section.
Quantize the performances.
2 RECORD THE DRUM GROOVES
Choose a sound to capture the sound you are looking for.
Try to avoid drastic changes in the groove when going from one section to another as this can be a distraction.
Write out your drum groove using the Drum Groove Organizer →
Record the drum grooves in four measure phrases.
Quantize and edit the velocities of the notes to the desired amount.
3 CREATE THE BASS LINES
Create bass lines for each four measure phrase by using the rhythm of the kick with the roots of the chords.
Add in octave jumps and leading tones if desired.
Write our your bass lines using the organizers for the Verse | Chorus | Bridge
Choose a sound that compliments the drum patch and adds to the vibe that you are looking for.
Record the bass line for each song section.
Quantize the performance, trim the ends of the notes to the correct subdivision, and edit the velocities to the desired amount.
4 CHART THE FORM
Fill out the Song Form Organizer using This Sountrap Project.
Make an instrument track.
Label it form
Use blank regions to trace the songs form- this can always be changed later.
Copy, paste, and duplicate the drum grooves, bass lines, and scratch chordal parts to match the form track.
Optional: Add in drum fills to the ends of song sections to help transition
5 RECORD THE CHORD PARTS
Choose complimentary sounds for the chordal parts
Determine the harmonic texture that you want for each song section by using cycle mode.
Make sure to differentiate repeated sections with contrasting rhythmic roles and that the parts are in different pitch ranges.
Capture your ideas by writing the chordal parts down in the bass and chord organizer.
Record the chordal parts for each song section.
Quantize the performance, trim the ends of the notes to the correct subdivision, and edit the velocities to the desired amount.
Copy, paste, and duplicate the chordal parts to match the form.
6 MIX THE TRACKS
Listen to the velocities in each part and make changes to each track accordingly.
Adjust the volumes of each track to create a balanced sound where nothing is too far front or back in the mix.
Carve out low frequencies in the tracks using a low cut filter at 80hz on everything except for the bass instrument.
Pan the different chordal instrument slightly off center to create a stereo image.
Lyrics
Top Lining
There are different workflows to writing lyrics; words can come before the music, words can be written at the same time as the music, and sometimes they come later. Writing lyrics and melodies to a track that has already been created is called top-lining and it’s one of the ways that today’s artists write their songs. A complete song or song section is given to an artist or songwriter, they listen to the track, and come up with the words and melodies. Write your own melodies and lyrics to your song.
7 COME UP WITH MELODIES
Loop a section and improvise wordless melodies.
Lengthen a section by copying and pasting the tracks and record yourself singing the melodies.
Listen back and find something that you like.
8 WRITE LYRICS
Add lyrics to your melody by telling a story or talking about something you feel strongly about.
Make sure the rhythm of the words rhythm in each line.
Rhythm words within each line and/or at the end of each line in a repeated pattern.
To help with your lyrics, start or end with a phrase from this List Of Adages →
Write the lyrics to each song section down in a notebook and come back to them if you get stuck.
Show your lyrics to a friend to get ideas from your peers.
The lyrics of the example song were written using top-lining. Here is a Copy Of The Lyrics →
Practice
9 WARM UP YOUR VOICE
Work on breathing from the diaphram by taking four counts of a breath in and breathing out for four counts on a hiss.
Do lip trills up and down your range.
Test to see if you are warmed up by singing a long tone on “do”.
10 PRACTICE THE PART
Practice the melodies with the recording until it feels natural.
Say the words in time with the music until you have achieved a smooth and connected flow between the words.
If you are having trouble matching the pitches exactly, don’t worry- autotune can be added after recording. Get a good warm up in by doing breathing exercises, lip trills, and long tones. Add character to your voice
11 CHARACTERIZE YOUR VOICE
Sing your line with your natural voice.
Find a reference for the style you want to sound like.
Experiment with creating your desired sound with your voice.
Make sure to keep the voice connected to the breathe and to maintain pitch accuracy.
Record
12 GET A GOOD SOUND
Find an acoustically dampened area to record that has little sound interruptions.
Use headphones when recording to keep the playback audio from getting into the recording
Set the input level so the mic doesn’t clip.
Keep the microphone two to four inches away from your mouth. If the microphone doesn’t have a built in pop filter, use one to keep the plosive consonants from creating pops in the recording.
Experiment with different mics and mic placement to get the best sound.
12 RECORD THE VOCAL
Create a vocal track on Soundtrap and change the preset to dry.
Sometimes it helps to set up more than one track for the vocal and record one phrase or section at a time on alternating tracks. This will allow for a more natural sound without cutting off the beginning or ending of the take.
Arm the track and turn monitoring off while using headphones, the audio delay with software monitoring is very distracting.
Record phrases, listen back, and re-record if needed. Try to not chase perfection- it’s frustrating!
12 ADD COMPRESSION, EQ, & EFFECTS
Add a little bit of compression using the one knob compressor.
Make EQ adjustments using the visual EQ effect.
If it sounds muddy, cut some at 250Hz.
If it sounds honky, cut some at 500Hz.
Cut if you’re trying to make things sound better.
Boost if you’re trying to make things sound different.
You can’t boost something that’s not there in the first place (cut before boosting).
Add a little reverb.
Add delay to taste.
MORE RESOURCES